Z.u.L. > Documentation > Context Help

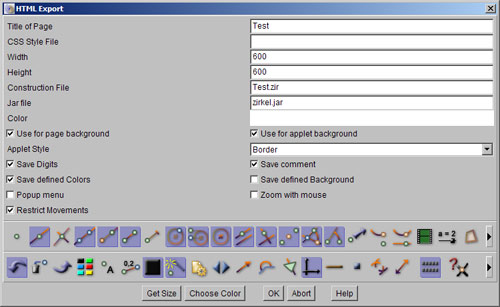
Applets can have several styles.
- Plain: The applet has no border. The user can only display hidden elements and move points. One should use the same color for the page and the applet in this case.
- Border: The applet gets a border.
- Border and Icons: The applet gets a border and icons. The user can construct things.
- Border, Icons and Status: The applet gets a status line. The status text is displayed in the browser status line too.
- Border, Icons and Input Line: The construction must be done in descriptive (non-visual) mode.
- Replay with Breakpoints: Three buttons are displayed to enable navigation from breakpoint to breakpoint. To set the breakpoints, use the replay tool.
Title of Page: This is the title of your page in <H1> style.
CSS Style-Files: Cascading Style Sheets are useful to give several pages a common appearance. If you do not use them, leave the input empty. Use a path relative to the program archive.
Width, Height: The dimensions of the applet display.
Construction File: The name of the file containing the construction, usually in the same directory as the HTML file. However, the file names must be relative to the program archive. Absolute URLs and paths are not allowed here.
Jar File: This is the program archive. The path must be relative to the HTML page.
Colors: You can choose a color for the page background and for the applet background. The color can be chosen with the button below.
Save Digits: Will save the settings for the number of digits. Should be enabled.
Show Comment: This will put the comment below the applet. All browsers should be able to handle the default UTF-8 encoding. If not switch to the Windows encoding in the special settings.
Moreover, there are switches to save the defined colors for the construction elements and for the construction background. The background of the construction can be different from the background of the applet and the background of the page.
Popup Menu: You can prevent the popup menu to appear.
Zoom with Mouse: You can enable the zoom and pan with the mouse button and wheel.
Restricted Movement: This allows only movements, such that no points get invalid. It works like the automatic track tool.
Tools: These two icon bars let you choose the tools, which should be displayed to the user. In any case, one should provide the undo tool. With the special icon for two lines the user gets two lines of tools.
The user can only define macros, if you give him the macro tool. And he can run only macros only, if this tool is available.
The icons with the question mark are switches for the object selection dialog, the question for points on objects and for intersections. By default, all these dialogs and questions are turned off in applets.
In the non-visual mode, the icons help the user to find the syntax. In this mode, all construction tools work.
Related topics: HTML Export, Export Assignments
Next topic: Export Assignments